Weighing the Cost: An Update on Ext4l Code Size
A recent series in Concept enables ext4l for an ARM board, finally allowing us to make a concrete comparison between the code size of this new Linux-ported driver and the existing U-Boot implementation.
Here is a short note on what we found.
The “Linux is Large” Reality
The first observation is that the Linux kernel no longer operates under strict code-size constraints. In the early days of embedded Linux, there was immense pressure to keep footprints tiny—projects like uClinux aimed to run in very limited RAM. Today, even embedded CPUs often have gigabytes of RAM, and they run the full kernel without blinking.
This shift shows through in the code. One striking example: ext4l contains about 20KB just in error messages and warnings. To put that in perspective, those strings alone take up roughly the same amount of space as the entire code size of the existing, legacy ext4 implementation in U-Boot!
Shoehorning a modern Linux filesystem driver into a bootloader was always going to involve trade-offs. Now, we have the numbers to quantify them.
The Weigh-in: Early Results
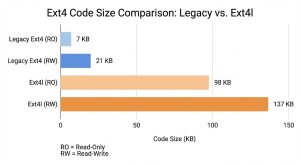
So, how heavy is ext4l? We ran comparisons on Thumb2 (specifically the firefly-rk3288).
- Legacy Ext4: ~7KB (Read-Only) / ~21KB (Read-Write)
- New Ext4l: ~98KB (Read-Only) / ~137KB (Read-Write)
There is no getting around it: ext4l is significantly heavier.
Is the Size Worth It?
The short answer is: Yes, because the legacy driver is becoming obsolete.
U-Boot’s existing ext4 implementation is losing utility in the modern world. Most modern Linux distributions enable metadata checksums (metadata_csum) by default, rendering their filesystems unmountable by the current U-Boot driver. While the legacy driver has basic journaling, it lacks support for fast-commits and other features required to interact safely with real-world partitions.
Despite the size increase, ext4l provides feature-parity with Linux, allowing U-Boot to reliably interact with modern filesystems.
The Path Forward: Top-Down or Bottom-Up?
We are currently taking a “Top-Down” approach: porting the full-featured Linux driver (ext4l) and then looking for size reductions. There are likely areas we can trim, but we must be careful not to spoil one of ext4l‘s major benefits: a small code delta compared to Linux, which makes maintenance easier.
However, there is a potential “Bottom-Up” path: we could enhance the legacy ext4 driver just enough to support required features like checksums, without importing the full Linux architecture. The end result would likely land somewhere in the middle—smaller than ext4l, but larger than the current legacy driver.
The downside? It creates a distinct codebase that requires its own maintenance, separate from the kernel.
For now, ext4l gives us compatibility today, but the hunt for optimization continues.